Are you planning to start a blog soon? If yes, then this is a “Checklist” that you should use to understand how to start a blog.
Remember, starting a blog is a process. To make sure you’re getting everything that needs to get done with this handy checklist.
A Simple Checklist To Start A Professional Blog
Choosing to start a blog, finding a topic you want to write about and then going out and buying a domain and getting it hosted is not an easy task.
You need a solid foundation on which you can build your “online business”. This checklist provides you the steps that you should really focus on right now for a strong foundation.
If you don’t know what you’re doing, you can be creating a foundation that is not really stable thus, all future work will be on shaky ground.
That is why today I decided to share this simple checklist to start a blog business. It’s the step by step process that has helped me in the past (and still use whenever I want to start another project) and will hopefully help you too on your journey.
Let’s have a quick look at the steps involved to start a new blog:
Niche Selection, Brainstorming Blog Name & Check availability
A niche is the basically a “topic” of your blog. It’s the topic you will be discussing on your blog to help others.
Remember that, picking a broader niche make it harder for you to get your blog noticed.
Also, the more targeted you can be, the better. For example, Let’s take the “clothes” niche as an example:
Having your business about “clothes” is way too broad and you’ll be competing with established blogs like Zappos, Forever 21, ASOS, Amazon etc…
What you need to do is target it down as deep as possible, say maybe: “men’s jackets”. But that to can be a little bit too broad so we might go for “men’s leather jackets”
That might seem super targetted, and it is. Also, note that no niche is too narrow or too small either.
You can always expand to broader topics in the future but only once you have an established authority in one area of a niche.
Once you have finalized the niche, the next is to get a domain name & web hosting.
[junkie-toggle title=”FREE Domain Name” state=”closed”] Get FREE Domain name when you buy hosting from Bluehost. Get cheapest shared hosting from Bluehost from here. [/junkie-toggle][junkie-toggle title=”Web Hosting in 2.65/Month (Free Domain)” state=”closed”] Click Here to learn how can you get Hosting in just 2.65/Month or $95 for 3 Years Hosting + 4 Free Services [/junkie-toggle]
Purchase Domain Name & Web Hosting
If you are new to blogging then you might want to know what they are? Right!
[junkie-dropcap]D[/junkie-dropcap]omain name is basically the name of your website or blog. And Web Hosting is the place in the network where you keep/host your files like WordPress Installation files, theme files, images, videos etc so that your website can be accessible to other users over the Internet.
[junkie-dropcap]W[/junkie-dropcap]eb Hosting is the place in the network where you keep/host your files like WordPress Installation files, theme files, images, videos etc.
This makes your website accessible to anyone over the Internet.
From where I can get this? Preferably cheaper.
If you ask me, I buy domain names mainly from Namecheap all the time. Why? Because at other places, you can get domains cheaper for the first year but it costs more at the time of renewal so in long run you would end of paying more.
You know why?
Because other sellers sell domains at the cheaper rate for the first year but they costs more on renewal. So basically, you end up paying more in long run. Make Sense right?
Point Domain To Host (If purchased separately)
When you are done buying domain & web hosting (from the same seller like Bluehost, Hostgator, eHost, InMotion etc. , the next step is to install Content Managment (Eg. WordPress) to your domain address using C-Panel provided by the web host.
But If you buy the domain from one seller (like NameCheap) & buy your web hosting from another seller (like Bluehost), then the next steps is to point that domain address to host servers. This is also called “Adding Nameserver” or “Adding Custom Nameservers”
[junkie-alert style=”red”] If you have purchased domain name from NameCheap and want to point your domain name to the web host nameservers, then you can add them here –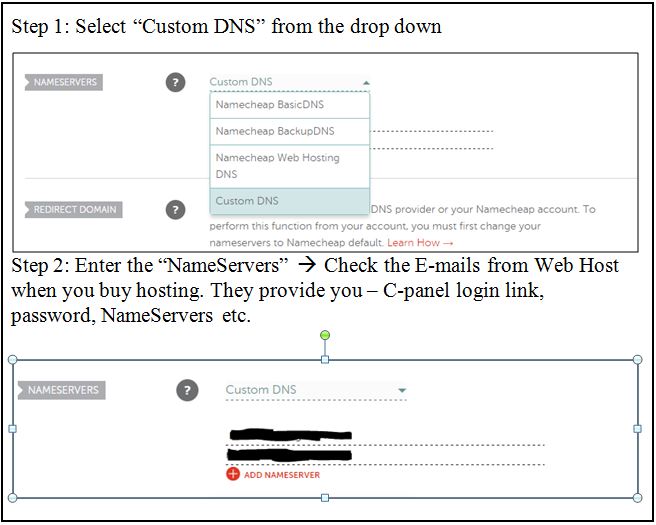 [/junkie-alert]
Create Brand New E-mail Address
The next thing after this is to create a brand new email address using domain address like contact@yourdomainname.com.
You can create new email addresses this using C-panel.
[junkie-toggle title=”BlueHost C-Panel” state=”closed”] 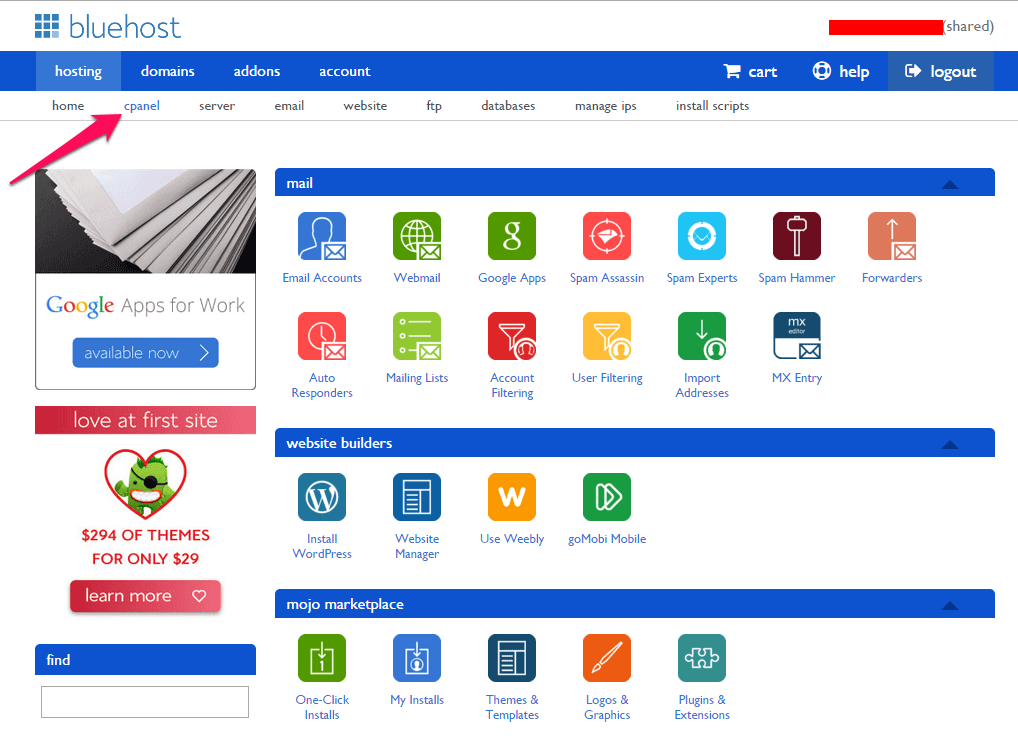 [/junkie-toggle][junkie-toggle title=”Hostgator C-Panel” state=”closed”]
 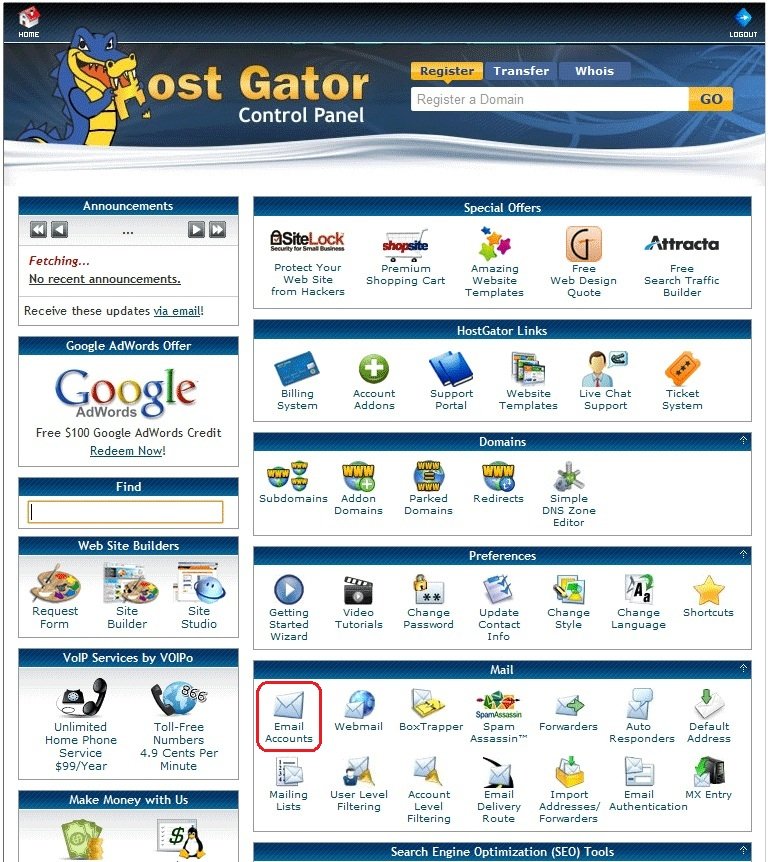 [/junkie-toggle]
Install WordPress
At this point, you are all set for installing “WordPress” to your domain. See below if you are not sure from where to start (for Bluehost Users & Hostgator Users)
[junkie-toggle title=”Install at Bluehost” state=”closed”] 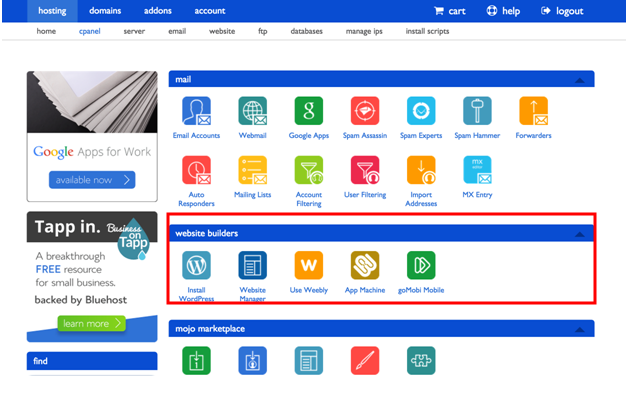 [/junkie-toggle][junkie-toggle title=”Install At Hostgator” state=”closed”]
 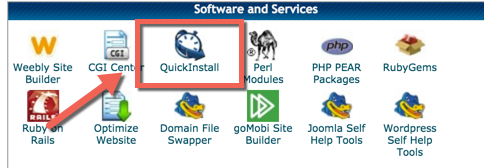 [/junkie-toggle]
Setup Google Analytics
Google Analytics is a free web analytics service offered by Google that tracks and reports website traffic.
Google launched the service in November 2005 after acquiring Urchin. Google Analytics is now the most widely used web analytics service on the Internet.
It’s very important for you to set this up from day one. Here is a detailed post on how to use Google Analytics:
How to Use Google Analytics on My Blog Website
Change permalinks to be easily readable (i.e not ?p=123)
Changing the permalink structure on your website is a very important.
You should be absolutely sure you want to make this change to your site because it can potentially have an impact on your SEO.
Moreover, It can also cause a lot of other errors and broken links if it isn’t handled correctly.
So, before you start anything, go here and change your permalinks structure:
- Login to your WordPress
- In WordPress dashboard – Go To Settings and then Permalinks
[junkie-toggle title=”Permalink Structure That I Use” state=”closed”]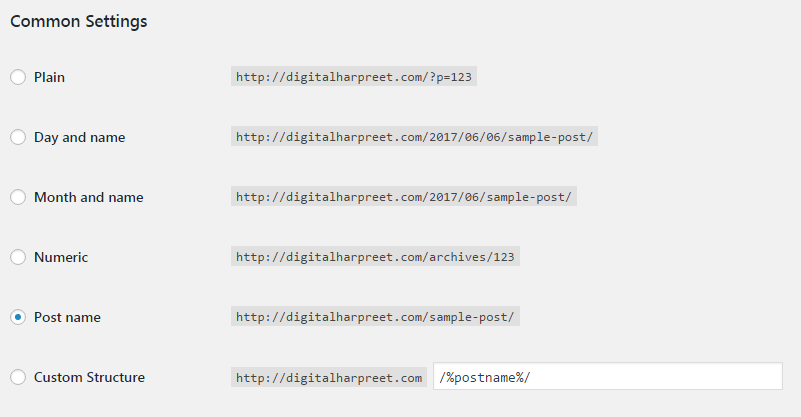 [/junkie-toggle]
WordPress General Setting
Set the following things under WordPress General Settings.
- Set the site title or the display name.
- Change Timezone
- Add A Gravatar
Other HouseKeeping Things
- Delete sample posts and pages
- Delete unused themes and plugins
- Update comment moderation settings
Purchase and Install Theme
This is the next big thing after buying the domain name and hosting for your blog.
As a beginner, you probably have heard about tons of available free and paid WordPress themes.
As you’re starting out, you may want to try out a few themes on your site until you find the right one that meets your needs.
If you’re looking to install a free WordPress theme from the WordPress.org themes directory, then the easiest way is by using the WordPress admin theme search functionality.
But what if you want to install a commercial “premium” WordPress theme from companies like StudioPress, MyThemeShop, ThemeJunkie, ThemeForest, DIYThemes etc.
You May Like This:
How to Get Genesis Theme + A FREE theme?
Get 50+ Premium Themes in Just $ 49.50
Next Steps…
- Create A Logo – You can use this FREE software
- Configure and Customize Theme
- Create and publish “About Page“
- Install and configure “Contact Form Plugin“
- Create and publish “Contact Page“
- Create and publish any additional pages like “Blog Page“, “Downloads” etc.
- Install and set up “Social Sharing Plugin” like SUMO
- Set up Categories and Tags – You can add new category & tags when you start writing posts too.
- Setup “Menus” – Primary, secondar etc.
- Setup “Widget Areas”
- Write and publish 2-3 blog posts
- Create Social Media Accounts & Configure social media plugins
Create an Email List
Since you are just starting out your own online business, it’s very important to understand “Why you need to create an email list?”
Remember, If you’re not building an email list, you’re making a HUGE mistake.
What email service provider I recommend? There’s only one.
It’s called AWeber. Why do I recommend AWeber? It’s easy to use. And it’s great for small AND large businesses.
Try AWeber free for 30 days! – AWeber Communications
Learn How To: Grow Your Business with Email Marketing
Add Opt-In Forms
Once you have the email list, the next you need is the Optin forms to collect the email addresses.
If you are using Aweber Email Marketing Solution then they also provide the default “Sign Up forms” that you can add to your website Widget areas to collect emails. See below:
But if you really wants to convert visitors into subscribers, try this – Optin Moster
Get 10% Off on OptinMonster – Use Coupon Code: “SAVE10”

And that’s it!
I’m sure that your initial blog setup should now be finished and ready to go LIVE.
If you are having any problems installing WordPress then this guide may help. You can contact me too if you want to avail my FREE blog setup Service.
If by some unfortunate circumstance you get stuck or have any questions for me about how to create a blog, just get in touch with me or leave a comment below. I’ll help you out with any problems.
Enjoy your new blog!
[junkie-alert style=”red”] Start a Blog with Bluehost today and get an exclusive discount plus a free domain name.
1. Web Hosting: 2.65/Month for 36 Months (It’s just $95 for 3 Years)
2. Free Domain (Worth $11.99)
3. Free Blog Installation & Setup
4. Free Backup Pro
5. Free Domain Privacy Protection
(Read this post to get Hosting in $2.65/Month)
[/junkie-alert]


this is my first visit to your blog and I really loved the information shared here…the language is very simple and easy to understand for new bloggers like me…you have shared all the important things required for blogging in short… thanks you Harpeet for sharing your knowledge with us..!!
Thanks, Arvind. Glad you like it!
Very very nice and informative! Thank you!
Thanks, Stella!
Thanks a Lot, Sir this article helped me a lot, please keep posting such content.
One thing I also realized is that when you choose a theme (especially for the free one via WordPress.com) you have to choose one that won’t be too complex. Meaning, you don’t want a theme that is slow to load. At least this is what I realized. Great tips!
Right! Choosing the right theme for your blog is a very important. The last thing that you don’t want to happen is that your website doesn’t load properly when you have visitor lol!
There’s a lot of really great information here. That’s really great of you to offer to help too. I may take you up on it if I get stuck. 🙂
Pingback: What You Should Know About SiteGround Before Signing Up | DH
Pingback: Black Friday Web Hosting Deals For Bloggers | DH
Pingback: 5 Tips To Start A Personal Development Blog In 2018
Pingback: 11 Factors To Consider Before You Choose Web Hosting Company
Pingback: DesignEvo: A Free Custom Logo Maker User Review | DH
A good checklist. You covered almost everything to start a blog from scratch.
One thing I would like to ask, when we start a blog, do we need additional pages like Privacy Policy and Disclaimer?
Thanks for sharing valuable busines strategies. Fantastic advice and tips for creating a successful business!.
Pingback: Taking Over Restaurant Digital Signage With Wordpress | DH